I had to install Ultra VNC over LAN and WAN and test for all the Windows operating systems such as Windows XP, Windows 2003 Server, Windows Vista, Windows 7 and Windows Server 2008. That was the time I first got my hands on VNC. With outdated documentation, I found it difficult, uninteresting and timewasting. But after putting much effort, I found a great deal about Ultra VNC and other VNC products. With that I was given the task of developing a Remote Desktop application. My knowledge is documented in a series of articles starting from this, with the intention of saving time and energy of anyone who’s reading this.
In this article I’ll explain the task of installing Ultra VNC to work on a Windows 7 machine with screenshots which lacks in many documentations I found for this subject on the internet.
Environment
- Ultra VNC version: 1.1.9.6
- Operation System: Windows 8 Ultimate 64-bit
What you need
- UltraVNC_1.0.8.2_Setup.exe file (downloaded from UltraVNC home page at www.uvnc.com/download/ )
- Active Internet connection (Setup requires to download some files as it installs)
Installation Steps
- Execute the exe file.
- Select a language.
- Accept the ‘License’ document.
- Select a destination location.
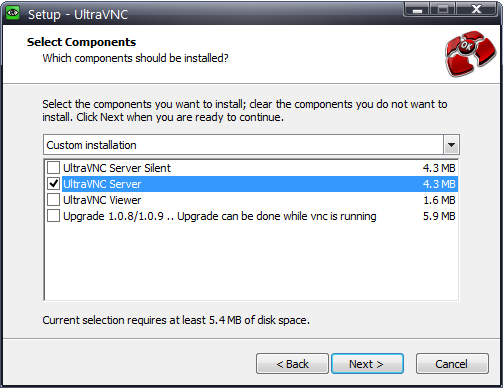
- Select the desired components to install.
- Specify a ‘Start Menu’ folder name.
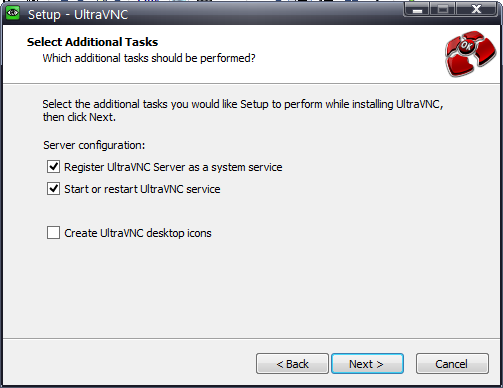
- If you are installing on a machine that has Windows Vista or above, you MUST check register as a system service option.
- Once all the steps are done finish the installation setup.
There should be 2 machines for the remote desktop concept to make sense. But remote desktop the local machine allow you to verify it’s working. In the remote desktop terminology, server is the machine which we need to remotely monitor or access. On the other hand viewer is the machine from which we remotely monitor the server.
So make sure you install the full setup (only if you are not much familiar with Ultra VNC, otherwise server on targeted machine and viewer on monitoring machine) on both machines and configure them as follows before testing.
Configuring the Ultra VNC Server
- Now check your system tray for blue color Ultra VNC logo.

- If it’s not there try restarting ‘uvnc service’ or restart your machine.
- Right clicking on this icon will give you a menu as below.
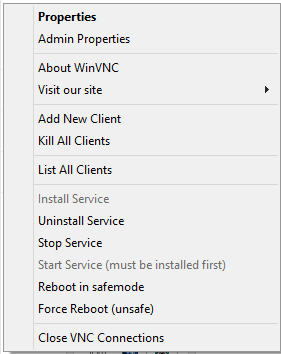
- Select ‘Properties’ and make sure all options are uncheck.

- Now again right click and select ‘Admin Properties’.

- In this, in ‘Incoming Connection’ section the displayed 2 ports (i.e Main: 5900 and Http: 5800) can be slightly different depending on your machine’s port availability. The main port number will be required later when connecting to the Ultra VNC server from an Ultra VNC viewer.
- Make sure you check ‘Allow Loopback Connections’ in the Incoming Connections section.
- Give two different passwords in the ‘Authentication section and remember them, because they will be required when remotely connecting.
- In ‘Misc.’ section do tick the first 2 options if you are installing this on a Windows Vista or above OS.
- Then apply the settings and press Ok.
- After closing the ‘Admin Properties’ reopen it and double check your selections are not changed.
- Then restart the ‘uvnc service’ manually.
Configuring the Ultra VNC Viewer
The default setting will be perfectly alright and will not require any configurational changes for the viewer to work.
Initiating Remote Desktop
- Start the Ultra VNC viewer.
- Specify the VNC Server as <server_ip :: server_main_port> and press ‘Connect’ leaving other options unmodified. It’s wise to first test the VNC installation by remotely connecting to the same machine. That’s why I have connect to localhost in port 5900 which is set in my Ultra VNC server’s ‘Admin Properties’.

- If is the Ultra VNC server is runing in the ip that you have provided and in the port you have mentioned you will see a connection status dialog box and a prompt for server password which you entered in the Ultra VNC server ‘Admin Properties’.

- If you want only to remotely view the machine, provide the view only password. If you want to actually work on the remote machine specify the vnc password and log in.
- If you have correctly installed and configured the Ultra VNC setup and you are connecting to the local machine from itself you will see something like this, else you will see the correct remote desktop screen of your Ultra VNC server machine.
- While a machine is remotely accessed by Ultra VNC, it will not interrupt the logged in user session as in ‘Windows Remote Desktop’. But you can detect that you are been monitored if your machine’s Ultra VNC server icon in the system tray goes yellow from default blue. It’s always yellow if viewers are connected to it.
No comments:
Post a Comment