Platform: Windows 7 (64bit) OS
SVN Client: TortoiseSVN
SVN Client: TortoiseSVN
These few steps will guide you on how to install your own basic SVN repository on a windows machine using the client, TortoiseSVN.
Step 1:
Go to TortoiseSVN download page at http://tortoisesvn.net/ and download the latest version of the application. In my case it was TortoiseSVN-1.8.4.24972-x64-svn-1.8.5.msi
Step 2:
Double click the installer and follow the wizard to set up the TortoiseSVN client application. This application can be installed to any location in the machine. For this example I’ll install it to E:\svn At the end of installation process restart will be requested. After rebooting the machine go for the Step 3.
Step 3:
Now go to the location where you installed the application (i.e. E:\svn) and create a new folder named ‘repository’.
Step 4:
Right click on this new folder and choose ‘TortoiseSVN’ –> ‘Create repository here’. Now your SVN repository is successfully created.

Step 5:
To upload your first set of files to the repository, in my case first folder with some documentation right click on the desktop and select ‘TortoiseSVN’ –> ‘Repo-browser’.

Then give the path to the newly created repository as file://path/to/the/repository

This is a view of your SVN repository created at the given location. Now right click on the middle and select Add folder as below and browse the folder you need to upload to the repository and then proceed with ok.
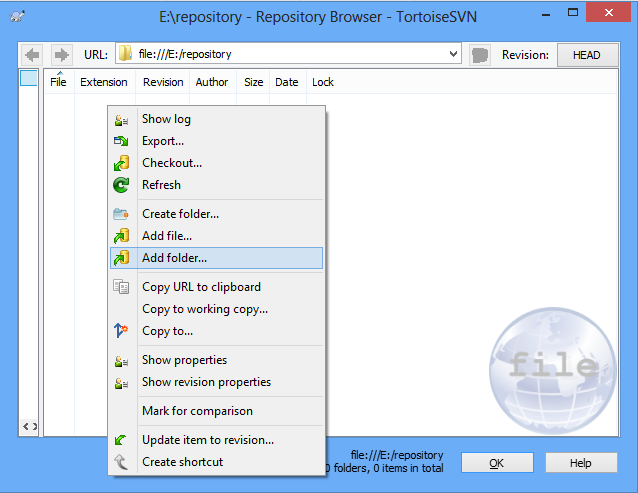
Now you can see your first set of files in the repository successfully.
Step 6:
For any further uploads to the repository you can proceed with right clicking the folder you need to upload and select ‘TortoiseSVN’ –> ‘Import’ and to download a working copy from the SVN, you can proceed by creating a new folder and then right clicking to select ‘SVN checkout…’. After modifying a checked out copy you can commit it back to the repository by right clicking and selecting ‘commit…’.
Step 7:
Until now there aren’t any users created to restrict the access to the repository. You can manually set the users by editing the ‘passwd’ file at following location ‘E:\svn\repository\conf\’ (w.r.t. this installation example).
When this file is opened in a text editor you can see the following lines.
[users]
# harry = harryssecret
# sally = sallyssecret
# harry = harryssecret
# sally = sallyssecret
According to this, a user can be created as ‘harry’ with the login password as ‘harryssecret’ by un-commenting the line by removing the ‘#’ sign in the beginning of it and saving the file. Likewise any number of users can be created to use the repository.
No comments:
Post a Comment