Pages

Thursday, March 25, 2010

Installing and configuring Hudson CI

Hudson
Hudson is a very user friendly Continuous Integration Server Software that can be used to monitor any type of project and inform you the status in many different ways. Hudson being an open source software, has an active community and has frequent releases when compared to many other open source projects with added features. It has a huge plug-in base that provides the capability to Hudson CI to be integrated to many other relevant applications.

Installing Hudson

To install Hudson you only need a Servlet/JSP container like Tomcat installed. The Servlet Container needs not to be limited only to Tomcat. But for this tutorial I’m going to use Apache Tomcat.
Tomcat bundle can be downloaded from http://tomcat.apache.org/download-60.cgi


After installing Tomcat you can download Hudson from http://hudson-ci.org/ as a single war file and can be deployed to Tomcat by a single click.

Configuring Hudson for use

Once you go to the Hudson Dashboard all the configurations can be done from ‘Manage Hudson’ link as follows,
figure :1
Once you are inside the ‘Manage Hudson’ link, you can see a screen as follows whether you must go to the ‘Configure System’ link to do the actual configuration.
figure :2
Essential Configuration Settings
Before building any java application we have to do 2 key configurations in ‘Configure System’ link. Those are to provide the JDK path and a build tool path. For this example we are using Ant as the build tool. Both JDK (downloadable from: http://java.sun.com/javase/downloads/widget/jdk6.jsp) and the Ant (downloadable from: http://ant.apache.org/bindownload.cgi) should be installed and tested before doing this step for easy isolation of faults at latter time.
figure :3
Create Users
Hudson doesn’t require users or user groups to be defined before using it to build jobs. But it is always better to define privileges to avoid unnecessary meddling from anonymous users.

To define users first check the ‘Enable Security’ option and select “Hudson’s own user database” and check ‘Allow users to sign up’ option. In the Authorization sub heading, select ‘Matrix base security’ where you can provide privileges to users. I have created ‘Guest’ user for demonstration purposes. Guest was marked with an error symbol because we have not created the Guest user yet, even though we set the privileges to the Guest user. Make sure you give at least one user all the administration privileges which can be used later to setup other configurations. After creating few users, save the settings from the ‘save’ button provided at the end of the page. This will redirect you to a login page.
figure :4
From the login page go to the link named, ‘Create an account’ to create a Guest account as follows,
figure :5
Create a java job
Go to ‘New Job’ tab to create a new job. Then enter a name and select ‘Build a free-style software project’ and click ‘Ok’.
figure :6
Then a job called ‘Test’ is created and the user is directed to job’s configuration page. In here we have to specify the Source Code Management tool path that we are using for this particular project and some additional features like which Build tool to use and the command to archive the artifacts.

As the source code management tool, I’m using Subversion. So I selected ‘Subversion’ under the SCM heading and gave the repository URL to my Test job, which is the repository URL for my project named ‘Welcome’.

Since ‘Welcome’ is a java web application, under the Build heading I selected Invoke Ant because I want Ant to build my java project. After selecting Invoke Ant from the drop down menu, specify the ‘Ant version’ from ‘Default’ to the Ant setup name, you created in the initial system configuration.

In ‘Post-Build Action’ we can program the CI Server to do many other operations other than building the project. Here I have checked ‘Archive the Artifacts’, which will save a working executable file along with the build. For this option it is required to correctly specify which file to be archived.

In ‘Post-Build Action’ it is also possible to set email notifications after every build. This option I have not shown here because I have not configured Email settings in system configuration.
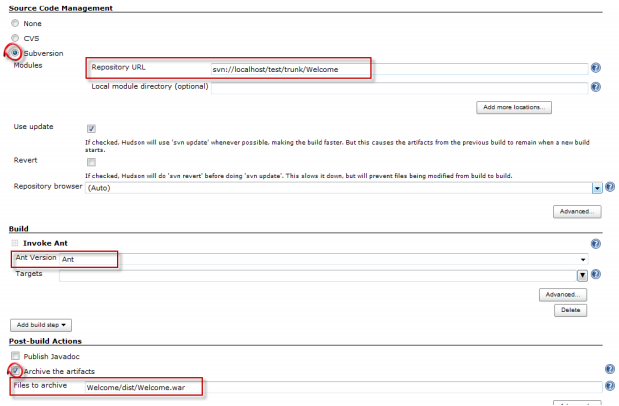
figure :7
Building a .NET project in Hudson
Before creating a job to build a .NET project there is a small system configuration to be done in ‘Configure System’ page. In this page now choose the ‘Manage Plug-ins’ link. After going to that page in the ‘Available’ tag under the heading ‘Build Tools’ check MSBuild option and click ‘Install’ button in the bottom right corner of the same page. After that through internet the plug-in will be downloaded and installed automatically. Once the plug-in is installed, Hudson CI is needed to be restarted.
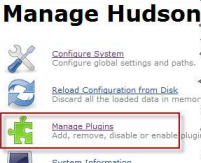
figure :8
Once the server is restarted, in the ‘Configure System’ page there is a new heading named, ‘MSBuild Builder’. In this, we have to provide the path to MSBuild installation in your machine which is an inbuilt tool shipped with Visual Studio setup and can be usually found in location C:\Windows\Microsoft.NET\framework\version.
figure :9
After performing this we can now create a job to monitor and build a .NET project as same as any java project job as follows,

figure :10
But now in the ‘Build’ heading we have to select ‘Build a Visual Studio project or solution using MSBuild’ option from the drop down instead of ‘Invoke Ant’. For the ‘MSBuild version’ we need to specify the Installation name we provided in the system configuration. And the build file is a file in your .NET project usually having the extension as .sln As the Command Line Arguments you can input the following line or an argument relevant to your project. Other two settings are as the same as for any java job. Now your .NET project job is ready for building. 
figure :11
Integrate Hudson with Jira
For this I used ‘Marvelution’ plug-in which can be used and downloaded for free. The steps in integrating this plug-in clearly explained in its home page http://www.marvelution.com/atlassian/jira-hudson-integration/integration/installation.html

Friday, March 12, 2010

Creating a JSR-168 compatible Hudson Portlet to Integrate to Liferay

For Setting up the IDE and creating a basic JSR -168 portlet please refer to the article on 9th March 2010 named, “Setting up the IDE for portlet Development”.

Create a standard JSR-168 portlet named Hudson with 3 JSPs each for hudson_view, hudson_edit and hudson_help. And Hudson.java class will automatically be created. This class has extended the GenericPortlet class by default.

In the hudson_view.jsp All the Hudson jobs status, name and URL to project should be displayed. Other than that the facility to dynamically filter the jobs by name is also should be given as in the following figure. Both error messages while connecting to Hudson server, filtering projects and success messages while retrieving jobs from the Hudson server should be displayed in the hudson_view.jsp

Figure1: Image of VIEW mode
hudson_view.jsp
Let’s look into imporant code segments used in creating this view mode.

Portlet preference will save user specific data for the portlet. In this portlet we are saving both Hudson URL and the user’s default filter as portlet preferences in hudson_edit.jsp page which will discuss later.

In the first line portlet preference instant is created.

In portlets to send data from a form or link in a JSP page actionURL is used. There are 2 ways of creating action URLs. In the 2nd line one of those methods are used to create an action URL.
Now I’m checking whether the user has configured the Hudson server URL previously. If he hasn’t then the portlet will provide a link to hudson_edit.jsp asking the user to configure the URL. Link will send a actionURL to the Hudson.java class with the parameter set to edit=link.
If the user has already configured the Hudson server URL, then show the dynamic project filtering form. Now again in this form we are sending data to Hudson.java class. To separate it from the data sent by the link lets change the edit parameter value to form.
In the html code of the form the css classes are called according to the JSR-168 portlet standard to maintain the same look and feel inside the portal page.
Then error messages and success messages are caught for display as follows. When there are no error messages we catch the HudsonPortlet ArrayList send by the Hudson.java class having details about the individual projects in the hudson repository.

Then the results are displayed inside a loop, in a table. At the end link to Hudson Dashboard is given separately.
hudson_edit.jsp
In this JSP page first error and success messages are caught and displayed. And a form to set Hudson URL and Default Project Filter is given. This form has the other way of providing an actionURL to send data for the Hudson.java class.
Prefs.getValue(“hudUrl”, “”) will get the portlet preference named hudUrl, but if that portlet preference is not set it will display an empty string.

hudson_help.jsp
This is a static page containing information regarding how to use the portlet and how to input data to different forms in both edit and view JSPs.

HudsonProject.java
This is a serializable class that represents a single Hudson job. It has an empty constructor and has getters and setters for all the private variables. Other than 8 getters and setters there is another class that gets a color name as the input parameter and use that to set both lastBuildStatus and lastBuildImage.

Drive.java
This class will get the Hudson URL and Filter from the Hudson.java class and use that URL in conjunction with the string “/api/xml” to create remote api call to Hudson repository which sends back an xml file in the following format.
Figure 2: Hudson remote api xml
Then Drive.java class will read this xml as a normal xml file as follows.

And for every element with the name “job” a HudsonProject object is created in memory and all the variables of that object is then set according to the sub elements of that job element as follows. In the mean time filter value is also been considered when initializing the created project. If it satisfies the conditions the new HudsonProject is added to the HudsonProject ArrayList named “project”.
The function “getTagValue()” is as follows,
Hudson.java
This is the extended class of GeneralPortlet class which is automatically created when creating the portlet. It has a processAction() method and 3 render methods each for different portlet mode. The 3 render methods are doView(), doEdit() and doHelp() which correspond to view, edit and help modes.

When viewing a page from decorators and controls or for the first time after adding the portlet portlet container will call directly the respective render method. This is a doEdit() method,
In this render method hudson_edit.jsp is dispatched. And the only method in PortletRequestDispatcher class, include() is called to pass the render request and response to the hudson_edit.jsp page.

doHelp() method is also similar to this above render method. But doView() has some differences. It gets a value for filter and URL and pass them to Drive instance as follows.

After setting proper values to filter and URL variables they are been passed to Drive class to get an ArrayList of HudsonProject objects. This ArrayList, errors and filter is passed to the request by setAttribute() method before dispatching the hudson_view.jsp page.
The processAction() method is called when a link is clicked or a form is submitted in any of the 3 JSP pages. From which page does the request is originated will be determined by the current portlet mode. This is the action to be carried out when the request is made by the hudson_view.jsp in view mode.
It will catch the parameter named “edit” from the request and if the value of the edit is equal to link the portlet mode is changed to EDIT so doEdit() will be executed. If the edit’s value is not equal to link request is coming from the form in the view page. So the form input is captured to string filter and that value is passed to doView() method.

This is the code to execute when an action request originated from the hudson_edit.jsp.
Capture the URL and filter sent from the edit form.
By pref.setValue(“hudFilter”, filter) method preference with the name hudFilter is set with the filter input set by the form. After setting both portlet preferences there are stored in an atomic function store() which need to be surrounded by try catch.

If this store() action was successful, a success message is set and send to the hudson_edit.jsp . Then sending messages to respective JSP page from processAction() method they need to be wrapped in URLEncoder.encode() function.
liferay-display.xml
This is Liferay specific code and this will help to change or create a new category in which the portlet will appear in the available portlet stack. By changing the value of category name this can be set to appear under different category other than Continuous Integration.

portlet.xml
In order for this portlet to work as desired there is one step left. And that is to add the portlet preferences tags inside </ portlet="">as follows,

The names of the preferences should exactly match those we used in the code for proper operation.

The full code of this project can be downloaded from here: DownloadHudsonPortlet.zip

Tuesday, March 9, 2010

Setting up IDE for Portlet Development

IDE: NetBeans 6.8
Portal: Liferay 5.2.3


Check List to complete

  1. Download and install latest JDK (1.6 or above). From http://java.sun.com/javase/downloads/index.jsp
  2. Download Liferay Tomcat Bundle. From http://www.liferay.com/downloads/liferay-portal/overview
  3. Install Liferay Bundle as mentioned in the documentation and make sure it works properly. From http://www.liferay.com/documentation/5.2
  4. Install NetBeans java bundle (6.5 or above)From http://netbeans.org/downloads/
  5. Download Portal Package 3.0 and Unzip From http://contrib.netbeans.org/portalpack/pp30/download.html

Configure Liferay Portal in IDE

  1. Run NetBeans IDE and Go to Tools -> Plugins
  2. Go to the Downloaded Tab

For the complete tutorial visit: Setting up IDE for Portlet Development

Rotor Machine Cipher

Rotor Machine cipher is a substitution cipher which falls under the subcategory of polyalphabetic substitution ciphers.

What is a rotor machine?
Rotor machine is an electro-mechanical equipment used to encrypt and decrypt plaintext to ciphertext in cryptography which was widely used in the 1930s-1950s. One of the most common implementation of rotor machine is Enigma machine which is shown below.

How Rotor Machines Operate
Recommended reference to understand the operation of rotor machine is given below.
http://www.cleavebooks.co.uk/trol/trolc07.pdf

Computer Security and Availability

Computer security is preventing and detecting unauthorized use of your system. It is said that the system which doesn’t allow any users to access its data and functions, has the highest security. In other hand more and more features and high performance will result in less secure systems. But such systems with no access, no performance and minimal features are simply useless in modern days. So we have to clearly balance between security and availability.
And another important fact about computer security in a enterprise is that the decisions regarding security ultimately should be driven by business requirements, not security requirements. Security requirements should be dictated by the business need, not the other way around.
A good article to refer about how to balance security and availability that I recommend is given below.
http://www.continuitycentral.com/feature0362.htm
Another good article for security for small business organizations is given below,
http://www.corpcomputerservices.com/network-security.php